In the world of gardening, did you know that overwatering plants can lead to root rot and kill more plants than a prolonged drought? In this guide, you’ll discover the essential steps to accurately measure soil moisture using a soil moisture meter. From selecting the right tool to properly inserting it into the soil and interpreting the readings, this guide provides a straightforward approach to achieving optimal moisture levels. By following these steps, you can ensure your plants thrive and avoid the shocking reality that 40% of all plant deaths are caused by improper watering!
1. Choose the Right Tool
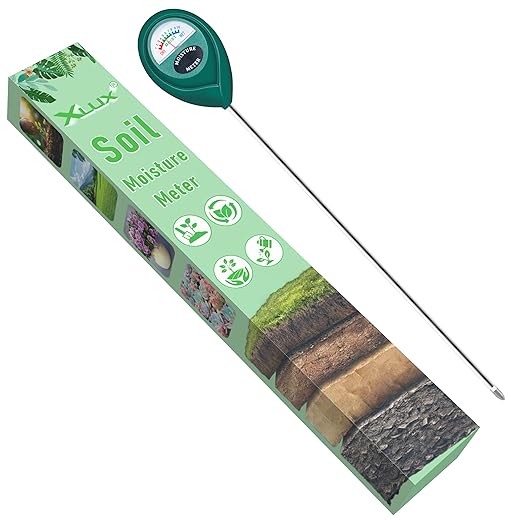
Evaluate the specific requirements of your plants and soil before selecting a soil moisture meter. Choose between analog and digital options based on your comfort with technology and the level of precision you need. Verify that the meter’s probe length is appropriate for the depth of the root zones you’re monitoring. Ensure it can accurately measure moisture levels for the particular soil type you are working with, as some meters perform better in certain soil conditions than others.
2. Prepare the Soil
Remove any surface debris, such as leaves or mulch, from the area where you plan to take measurements. Clear the space thoroughly to eliminate any potential barriers that can affect the accuracy of your soil moisture readings. Inspect the soil surface closely to ensure it is clean and unobstructed, as even small amounts of organic matter can skew your results. Once the area is prepared, you can confidently proceed with taking accurate soil moisture measurements.
3. Insert the Probe
Insert the probe of the moisture meter into the soil, ensuring it is positioned vertically. Push it down gently to the recommended depth of 2-4 inches for most plants, allowing it to settle into the soil without excessive force. Avoid pressing too hard, especially in rocky or compacted areas, as this may damage the moisture meter. If you encounter resistance, reposition the probe to a softer spot rather than continuing to apply pressure.
4. Take the Reading
Wait a few moments for the meter to stabilize. Observe the moisture level displayed on the meter.
- Identify the color or indicator that denotes the moisture condition:
- If the meter displays a “dry” reading, the soil requires watering.
- If the meter shows a “moist” reading, the soil is adequately hydrated.
- If the meter indicates a “wet” reading, avoid watering as the soil has sufficient moisture.
Record your observations for reference, ensuring that you maintain an accurate watering schedule for your plants.
5. Interpret the Results
Evaluate the moisture reading to determine your plants’ needs.
- Recognize that a low reading signals dry soil; understand this indicates your plants require immediate watering.
- Notice a high reading, which suggests that the soil retains sufficient moisture, indicating no watering is necessary at this time.
- Adjust your care accordingly based on these readings, ensuring optimal conditions for plant growth.
6. Check Multiple Areas
Check soil moisture in various locations within your garden or plant pots to gain a comprehensive understanding of moisture levels. Use a moisture meter or your fingers to dig a few inches into the soil in different spots, noting discrepancies in moisture content. For example, you may find that areas near a wall or those receiving more direct sunlight dry out quicker than shaded spots, indicating a need for more frequent watering in those regions. Adjust your watering practices based on these findings to ensure all plants receive adequate hydration.
7. Monitor Regularly
- Check the soil moisture using a moisture meter or your finger at least once a week, especially during hot or dry periods.
- Insert your finger about one inch into the soil; if it feels dry at that depth, it’s time to water.
- Keep a consistent schedule by recording your findings in a log; adjust your watering frequency based on the moisture levels you observe.
- Monitor for signs of over or under-watering, such as yellowing leaves or wilting, and adjust your watering practices accordingly.
8. Adjust Watering Practices
Monitor soil moisture levels regularly to determine when to water. When the top inch of soil feels dry, water deeply, ensuring that the moisture penetrates at least six inches down. Aim to water once a week, adjusting the frequency based on the weather conditions and your specific plants’ needs. Consider using a soaker hose or drip irrigation to deliver water directly to the roots, minimizing evaporation and promoting healthier growth.
9. Store the Tool Properly
Clean the probe thoroughly after each use to prevent residue build-up and maintain accuracy. Store the moisture meter in a safe, dry place that is free from moisture and extreme temperatures. Avoid exposing the device to outdoor elements, as this can lead to damage and reduced lifespan. Ensure the storage area is organized to prevent accidental drops or impacts that could harm the meter.
Final Thoughts on Measurement Techniques
In conclusion, accurately measuring soil moisture is a vital practice for successful gardening. By utilizing the appropriate tools and following the outlined steps, you can effectively monitor moisture levels, ensuring your plants receive optimal hydration. This not only promotes healthy growth but also enhances the overall health of your garden. Investing time in understanding soil moisture dynamics will lead to thriving plants and a flourishing outdoor space.
Essential Equipment Needed
- Soil moisture meter or probe
- Trowel or shovel
- Watering can or hose (for watering adjustments)
- Ruler or measuring tape (optional for specific readings)
- Clean cloth or towel (for cleaning the tool)
- Calibration solution (if required for certain meters)
Maximize Tool Accuracy
- Choose the Right Tool: Select a soil moisture meter that suits your specific needs, whether for gardening, agriculture, or research
- Calibration: Before measurement, ensure the tool is properly calibrated according to the manufacturer’s instructions for accurate readings
- Depth of Measurement: Insert the probe to the recommended depth for the type of plants or crops you are testing to get a representative moisture reading
- Avoid Compacted Soil: Ensure the soil is not compacted around the measurement area, as this can lead to misleading moisture levels
- Multiple Readings: Take readings from various spots within the same area to account for variability in soil moisture
- Timing: Measure soil moisture early in the morning or late in the afternoon when evaporation is minimized for more accurate results
- Consider Soil Type: Be aware of how different soil types (sand, clay, loam) retain moisture differently when interpreting your readings
- Monitor Long-Term Trends: Regular monitoring over time helps to establish moisture retention patterns and aids in better irrigation planning
- Clean the Probe: After each use, clean the probe to prevent cross-contamination and ensure consistent readings
- Follow Up with Irrigation: Use the moisture readings to make informed decisions about watering, avoiding over or under-watering
Essential Tips and Techniques for Effective Use of Your Garden and Outdoor Tools
- Familiarize Yourself with Tools: Begin by learning the purpose and function of each garden tool, such as trowels, pruners, rakes, and shovels. This will help you understand which tools are suited for specific tasks
- Start with Basic Maintenance: Use simple tools like hand trowels and pruners to perform basic tasks such as planting, weeding, and trimming. Gradually progress to larger tools like rakes and hoes as you become more comfortable
- Follow Proper Techniques: Educate yourself on the correct techniques for using tools to ensure efficiency and prevent injury. For example, when using a shovel, keep your back straight and use your legs to lift, rather than straining your back
- Maintain Your Tools: Regularly clean and sharpen your tools to keep them in good condition. Proper maintenance extends the life of your tools and enhances performance
- Practice Safety Measures: Always wear appropriate safety gear, such as gloves and sturdy shoes, when using garden tools. Be aware of your surroundings to prevent accidents and injuries while working
Essential Tools for Every Gardener
How often should garden tools be cleaned and maintained?
Garden tools should be cleaned and maintained after each use to ensure optimal performance and longevity. Specifically, it is recommended to:
- Clean: Remove dirt and debris from tools after every use. For tools that have come into contact with soil, a scrub brush or a putty knife can be effective in removing any residues.
- Sharpen: Blades should be sharpened at least once a season or more frequently if you use the tools regularly. This helps ensure clean cuts and reduces strain on the tools.
- Oil and Rust Prevention: Metal parts should be oiled to prevent rust. A light coat of vegetable or motor oil applied to the metal parts after cleaning can help protect against corrosion.
- Inspect: Regularly check tools for signs of wear or damage, addressing any issues immediately to prevent accidents or further damage.
By following this maintenance schedule, you can extend the lifespan of your gardening tools and enhance your gardening experience.
How can you use garden tools to create raised beds or planters?
Creating raised beds or planters using garden tools is a straightforward process that can enhance your gardening experience. Here’s how you can do it:
- Gather Necessary Tools: You will typically need a shovel or spade, a rake, a measuring tape, a level, and potentially a saw (if cutting wood), as well as gardening gloves.
- Select a Location: Choose a level area with adequate sunlight for your raised bed or planter. Ensure the ground is free of weeds and debris.
- Decide on Size and Shape: Measure the desired dimensions of your raised bed or planter using a measuring tape. Standard dimensions for raised beds are often 4 feet wide and up to 6 feet long, though it can vary based on space and needs.
- Construct the Frame: If using wood, cut the pieces to size using a saw, then assemble them to create a frame. Corner brackets can be used for added stability. Alternatively, you can use materials like cinder blocks or bricks.
- Prepare the Base: Use a shovel to remove the top layer of sod or soil where the raised bed will sit, allowing for better drainage. Level the area with a rake.
- Fill the Raised Bed: After placing your wooden frame or other materials, fill the raised bed with a mixture of topsoil, compost, and other soil amendments to create nutrient-rich planting conditions.
- Edging and Finishing Touches: You may want to create borders or pathways around your raised bed for accessibility, which can be facilitated using a rake to distribute soil and leveling tools to ensure even edges.
These steps, facilitated by appropriate garden tools, will help you create effective raised beds or planters, optimizing your gardening space and improving plant health.

