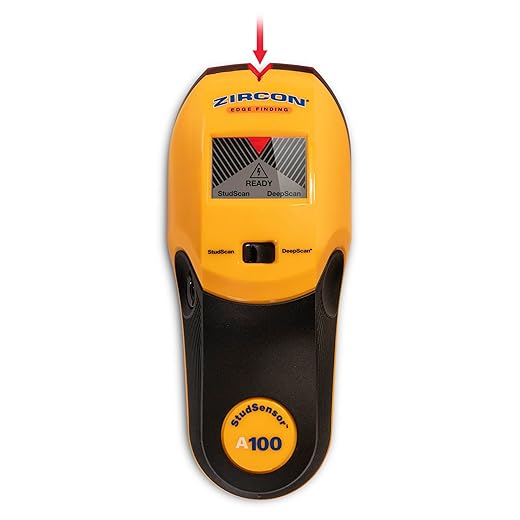
This guide outlines a straightforward, step-by-step process for effectively using a stud finder, a vital tool for both DIY enthusiasts and professional contractors. It offers practical instructions on selecting the right stud finder, properly calibrating it, and interpreting its readings to accurately locate studs within walls. By following these steps, users can enhance their installation and home improvement projects, ensuring secure and precise placements for fixtures and hangings.
1. Choose the Right Stud Finder
Select a stud finder that fits your project’s needs. Consider magnetic stud finders, which detect screws or nails, ideal for lighter tasks. Opt for electronic stud finders if you require precise location capabilities, as they can indicate the edges of studs and provide depth readings. Ensure you read the specifications and functionalities of each type to make an informed choice.
2. Read the Instructions
Read the user manual carefully to familiarize yourself with the specific features and settings of your stud finder model. Note any unique calibration process mentioned in the manual, as this could affect the accuracy of the tool. Practice adjusting settings as directed to enhance performance and reliability. Verify operational indicators, such as lights or sounds, to ensure correct functionality during use.
3. Prepare the Wall Surface
Clear the wall of any items, including pictures, shelves, or wall hangings, to create an unobstructed surface. Wipe the wall down with a damp cloth or sponge to remove dust, dirt, and grease, ensuring a clean area for the stud finder to operate effectively. Check for any nails or screws that may be stuck in the wall and remove them to prevent interference during the scanning process. Ensure that the area is well-lit, allowing you to see any indicators displayed by the stud finder clearly.
4. Calibrate the Stud Finder
Turn on the stud finder by pressing the power button, ensuring it is fully charged or plugged in if necessary. Place the device against a flat, clean area of the wall, avoiding textured surfaces or areas with paint that may interfere with signal reception. Follow the manufacturer’s specific calibration instructions, typically by holding the stud finder in place for a few seconds until it signals its readiness for use. For example, a beep or light indicator may confirm it has been calibrated correctly, which is essential for ensuring accurate readings later on.
5. Start Scanning
Hold the stud finder against the wall, positioning it flat against the surface for maximum accuracy. Move the device horizontally across the wall at a slow and steady pace. Pay close attention to the lights or sounds emitted by the finder, noting any changes that indicate the presence of a stud. Adjust your speed as necessary to ensure you don’t miss any important signals.
6. Mark the Stud Location
Lightly pencil in the mark on the wall where the stud finder indicates the stud’s location. Position the mark at the left edge of the stud first, ensuring it is clear and visible. Then, move a few inches to the right and make a second mark at the right edge of the stud. These two marks will help you easily locate the center of the stud later—simply measure the distance between the two marks and divide by two.
7. Double-Check Your Marks
Run the stud finder over the marked area again to ensure accuracy. Observe the signals displayed on the tool; if they indicate the presence of a stud, you can move forward confidently. Adjust the position of the stud finder slightly if necessary, as this may provide clearer signals. Confirm the stud’s location by making additional marks to guide your next steps.
8. Locate Additional Studs
Continue scanning the wall horizontally using your stud finder. Move the device in 16 or 24-inch increments from the previously identified stud to locate the next one. When the stud finder signals a finding, mark the location clearly with a pencil. Repeat this process until you identify all necessary studs for your project.
9. Drill or Nail with Caution
- Confirm the location of the studs by gently tapping the wall and listening for changes in sound, or by using a stud finder to ensure accuracy.
- Position your drill or nail gun perpendicular to the wall to maintain a straight path; this helps minimize complications and ensures a secure hold.
- Adjust the drill depth settings according to the material of the wall and the length of the screws or nails being used; for instance, use shorter screws for drywall and longer ones for attaching heavy objects.
- Avoid excessive pressure while drilling; this can prevent damage to underlying electrical wires or plumbing. Be cautious in areas where dual outlets or fixtures are located, as these may have hidden installations nearby.
- Use a circuit tester near the drill area before proceeding to ensure no live wires are present, especially if you’re working in older homes where wiring might not be up to code.
Master Your Stud-Finding Skills
In conclusion, mastering the use of a stud finder is essential for achieving precise and secure installations. By carefully selecting the appropriate tool, adequately preparing the wall surface, calibrating the device correctly, and accurately marking the stud locations, you can enhance your DIY skills and ensure the safety and durability of your projects. Embracing these best practices will not only simplify your tasks but also contribute to a more efficient and successful outcome.
Essential Equipment List
- Stud finder
- Level
- Tape measure
- Pencil
- Drill or hammer
- Drill bits or nails
- Safety goggles
- Wall surface cleaning cloth
- Marking tape
Master Your Technique
- Calibrate the Tool: Before using the stud finder, ensure it is properly calibrated according to the manufacturer’s instructions to increase accuracy
- Choose the Right Mode: Depending on your stud finder model, select the appropriate mode for detecting wood, metal, or AC wires to ensure effective scanning
- Position the Tool Correctly: Hold the stud finder flat against the wall and move it slowly horizontally, maintaining consistent pressure to avoid false readings
- Sweep the Area: Begin scanning from one side of the wall and move to the other, ensuring you cover the entire area where you expect to find studs
- Mark the Location: Use a pencil to mark the detected stud locations, and recheck by moving the stud finder to ensure consistent readings
- Check for Multiple Studs: After identifying one stud, continue to scan to locate nearby studs since they are typically spaced 16 or 24 inches apart
- Avoid Electrical Interference: Turn off devices that may interfere with readings and scan away from outlets and switches to reduce false positives
- Account for Wall Materials: Be aware that different wall materials (like drywall, plaster, or concrete) may require different techniques or settings on the stud finder
- Look for Additional Features: Use advanced features, such as depth detection and wire warning signals, if available, for a more comprehensive locating experience
- Practice Make Perfect: Familiarize yourself with your stud finder on different walls to learn its quirks and improve your scanning technique over time
Step-by-Step Guide to Effectively Locate Studs in Your Walls
- Choose the Right Stud Finder: Select a stud finder that is best suited for your needs, such as a magnetic stud finder for basic tasks or an electronic stud finder for more advanced detection of wiring and pipes
- Calibrate the Tool: Before use, ensure you calibrate the stud finder according to the manufacturer’s instructions. This usually involves placing it on the wall and pressing the button to allow it to adjust to the wall’s surface
- Scan the Wall: Hold the stud finder flat against the wall and slowly move it horizontally. If you’re using an electronic model, look for visual indicators or listen for beeps that signal the detection of a stud
- Mark the Location: Once a stud is detected, mark the location with a pencil to indicate where you’ll be anchoring your screws or nails. Repeat the process to confirm the stud’s edges for accurate placement
- Test for Accuracy: After marking, remember to scan the area again using the stud finder to ensure you have located the stud correctly. It’s helpful to find and mark the edges of the stud to identify its center for more precise installations
Your Questions About Using a Stud Finder Answered
Are there any special features that some stud finders offer?
Yes, many stud finders offer a variety of special features that enhance their functionality. Some of these features include:
- Multi-mode scanning: Some stud finders provide different modes for detecting various materials, such as wood, metal, or AC wiring, allowing for versatile usage depending on the application.
- Depth sensing: Advanced models can measure the depth of the stud or the material behind the wall, helping users to locate studs accurately, especially in thicker walls.
- Visual indicators: Many stud finders come equipped with LED lights or screen displays that indicate the location of the studs, the depth, and whether electrical wires are present.
- Audio alerts: Some devices provide audible beeps or sounds to indicate when a stud or wire is detected, which can be useful in noisy environments.
- Calibration features: Certain stud finders include automatic calibration functions to ensure accurate readings, adapting to different wall types and conditions.
- Wireless connectivity: Newer models may offer Bluetooth or app integration, allowing users to visualize the stud finding process on a smartphone or tablet, enhancing the user experience.
These features can improve the accuracy and ease of use, making stud finders a valuable tool for various DIY and professional projects.
What is a stud finder and what is its primary function?
A stud finder is a tool used in construction and home improvement to locate framing studs behind walls, ceilings, and floors. Its primary function is to identify the location of wooden or metal studs, which are structural elements that provide support for the construction. This is crucial when hanging heavy objects such as shelves or cabinets, as securing them directly to a stud ensures they are properly anchored and can safely bear the load. Stud finders typically use either magnetic sensors to detect screws or nails in the studs or electronic sensors to gauge the density of the wall material.

